
こんにちはー!むちょこです。
今回は、PHPを動かすために欠かせないLAMP環境の構築手順をご紹介したいと思います。
まっさらな状態から実際に開発が始められるところまでの一連の手順をまとめました。
前提
この記事では、さくらのVPS
![]() で”yum update”のスタートスクリプトのみ実行した状態から始めます。OSはCentOS7です。
で”yum update”のスタートスクリプトのみ実行した状態から始めます。OSはCentOS7です。
ここでインストールしたバージョン
- Apache 2.4.6
- MariaDB 10.4.12
- PHP 7.4.3
Apache
インストール
インストール前に、念のためまだインストールされていないことを確認
# httpd -version
-bash: httpd: command not found
yumでインストール
# yum -y install httpdインストールされたことを確認
# httpd -version
Server version: Apache/2.4.6 (CentOS)
Server built:   Aug  8 2019 11:41:18
自動起動設定
# systemctl enable httpd.service
Created symlink from /etc/systemd/system/multi-user.target.wants/httpd.service to /usr/lib/systemd/system/httpd.service.
確認
# systemctl is-enabled httpd
enabled
起動
# systemctl start httpd確認
# systemctl status httpd
...
Active: active (running)
sslモジュールのインストール
まだインストールされていないことを確認
# httpd -M | grep sslyumでインストール
# yum -y install mod_sslhttpd再起動
# systemctl restart httpdMariaDB
インストール
まだインストールされていないことを確認
# mysql --version
-bash: mysql: command not found
リポジトリ追加
# curl -sS https://downloads.mariadb.com/MariaDB/mariadb_repo_setup | bashyumでインストール
# yum -y install MariaDB-server確認
# mysql --version
mysql  Ver 15.1 Distrib 10.4.12-MariaDB, for Linux (x86_64) using readline 5.1
自動起動設定
# systemctl enable mariadb確認
# systemctl is-enabled mysqld
enabled
起動
# systemctl start mariadb確認
# systemctl status mariadb
...
Active: active (running)
文字コード設定
# vim /etc/my.cnf.d/server.cnf[client]
default-character-set = utf8mb4
[mysqld]
character-set-server = utf8mb4再起動
# systemctl restart mariadb確認
# mysql -uroot

MariaDB [(none)]> show variables like 'char%';
+--------------------------+----------------------------+
| Variable_name            | Value                      |
+--------------------------+----------------------------+
| character_set_client     | utf8mb4                    |
| character_set_connection | utf8mb4                    |
| character_set_database   | utf8mb4                    |
| character_set_filesystem | binary                     |
| character_set_results    | utf8mb4                    |
| character_set_server     | utf8mb4                    |
| character_set_system     | utf8                       |
| character_sets_dir       | /usr/share/mysql/charsets/ |
+--------------------------+----------------------------+
8 rows in set (0.001 sec)
PHP
インストール
まだインストールされていないことを確認
# php -v
-bash: php: command not found
最新バージョンを確認
https://www.php.net/downloads.php
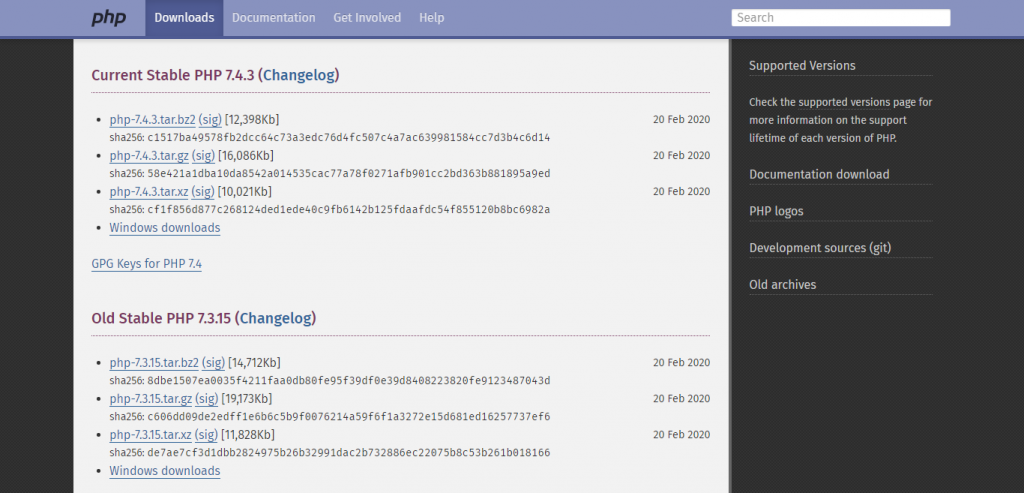
“Current Stable PHP”のバージョンが7.4.3になっていたので、今回は7.4系を入れます。都度ご確認いただき、最新を入れていただくのが良いと思います:)
リポジトリ追加
# yum -y install http://rpms.famillecollet.com/enterprise/remi-release-7.rpmyumでインストールできるphp74系の名前を確認
# yum list | grep php74PHPと必要なモジュールをインストール(使いたいモジュールに合わせて、適宜変更してください)
# yum -y install php74 php74-php php74-php-bcmath php74-php-json php74-php-mbstring php74-php-pdo php74-php-xml php74-php-mysqlnd --enablerepo=remi-php74インストールできたことを確認
# php74 -v
PHP 7.4.3 (cli)
symlinkを貼る
php74のパスを確認
# which php74
/usr/bin/php74
phpコマンドでphp74コマンドを呼び出せるようにsymlinkを貼る
# ln -sf /usr/bin/php74 /usr/bin/php確認
# php -v
PHP 7.4.3 (cli)
設定
# vim /etc/php.inidate.timezone = "Asia/Tokyo"
mbstring.language = Japanese
mbstring.internal_encoding = UTF-8
mbstring.http_input = pass
mbstring.http_output = pass
mbstring.encoding_translation = Off
mbstring.detect_order = auto
mbstring.substitute_character = none;
mbstring.func_overload = 0
mbstring.strict_detection = Off.htaccessの許可
# vim /etc/httpd/conf/httpd.conf<Directory "/var/www/html">
AllowOverride All
</Directory>作業用ユーザの作成
新規ユーザの作成
# useradd [ユーザ名]パスワードの設定
# passwd [ユーザ名]一旦ログアウトして、作成したユーザでログインしてみる
鍵認証設定(Putty利用)
- PuTTYgenで鍵を作成
- scp等で作成した公開鍵ファイルを、作業用ユーザのホームディレクトリにアップロード
- 作業用ユーザでログイン
- 公開鍵ファイルを設置
$ cd ~
$ mkdir .ssh
$ chmod 700 .ssh/
$ ssh-keygen -i -f 公開鍵ファイル名 >> authorized_keys
$ mv authorized_keys .ssh
$ rm 公開鍵ファイル名
$ exit
秘密鍵を使用してログインできることを確認
もしできなかったら、authorized_keysファイルのパーミッションが誤っている可能性もあります。以下を試してみてください。
$ chmod 600 authorized_keyssudo設定
作業用ユーザからrootユーザになる
$ su作業用ユーザをwheelグループに追加
# usermod -G wheel [作業ユーザ名]rootユーザ、作業用ユーザ両方からログアウト
# exit
$ exit
再度作業用ユーザでログイン
sudoが使えることを確認
$ sudo idログイン設定とSSHポート変更
rootでのログイン禁止とパスワード認証禁止を設定
$ sudo vim /etc/ssh/sshd_configPort [任意のポート番号] #ポート番号
PermitRootLogin no #rootログイン
PasswordAuthentication no #パスワード認証sshd再起動
$ sudo systemctl restart sshd確認
$ sudo systemctl status sshd
...
Active: active (running)
rootでログインできないことを確認
$ ssh root@localhost -p [設定したポート番号]
Permission denied (publickey).
ファイアウォール
ポート設定を変更
$ sudo vim /usr/lib/firewalld/services/ssh.xml <port protocol="tcp" port="[設定したポート番号]"/>起動
$ sudo systemctl start firewalld確認
$ sudo systemctl status firewalld
...
Active: active (running)
httpとhttpsのポートも開けておく
$ sudo firewall-cmd --permanent --zone=public --add-service=http
$ sudo firewall-cmd --permanent --zone=public --add-service=https
$ sudo firewall-cmd --reload
確認
$ sudo firewall-cmd --list-all
public (active)
...
services: dhcpv6-client http https ssh
ログアウトして、鍵認証&設定したポートでログインできることを確認
バーチャルホスト設定
※予めDNS設定を行ってください。
未定義ホストのアクセス拒否
$ sudo vim /etc/httpd/conf.d/undefined.conf<VirtualHost _default_:80>
ServerName any
<Location />
Require all denied
</Location>
</VirtualHost>
<VirtualHost _default_:443>
ServerName any
<Location />
Require all denied
</Location>
</VirtualHost>ドメインごとの設定
$ sudo vim /etc/httpd/conf.d/[ドメイン].conf<VirtualHost *:80>
ServerName [ドメイン]
DocumentRoot /var/www/html/[ドメイン]/[プロジェクト名]/public
ErrorLog logs/[ドメイン]-error_log
CustomLog logs/[ドメイン]-access_log common
</VirtualHost>
<VirtualHost *:443>
ServerName [ドメイン]
DocumentRoot /var/www/html/[ドメイン]/[プロジェクト名]/public
ErrorLog logs/[ドメイン]-ssl_error_log
TransferLog logs/[ドメイン]-ssl_access_log
</VirtualHost>エラーを確認
$ httpd -t
AH00112: Warning: DocumentRoot [/var/www/html/[ドメイン名]/[プロジェクト名]/public] does not exist
AH00112: Warning: DocumentRoot [/var/www/html/[ドメイン名]/[プロジェクト名]/public] does not exist
Syntax OK
DocumentRootが存在しないというエラー以外が出ていなければOK
Apacheの再起動
$ sudo systemctl restart httpdこれでサーバの準備は完了です。
あとは設定したDocumentRootを基準に開発を進めてください:)
[…] 2020.03.11LAMP環境の構築手順 […]